
shiny web2.0 button tutorial using photoshop cs2
Tuesday, October 14, 2008 | Labels: button tutorial, create button, hover button, shiny button | |My first ever tutorial, a friend ask me to make a tutorial on nav button with hover effects using imageready but i was too busy and takes time to make as i am lazy in making tutorials lol.... but i have decided to make my first tutorial to all of you, its a simple tutorial and here i will show you how to make a simple but nice button... here is what it should look like, i hope...

Ok here we go, first thing is we have to create a new canvas, any size you like but make sure to set the resolution to 72 px/in as it will not look like this one if its a little higher, but you could try to different resolution and see what it looks like, here i made a 400 x 400 canvas with white background, click shift+d to reset your foreground and background color settings in your tools, choose the rounded rectangle tool and set the radius to 15 px or any value that you think looks greate, name the layer as shape 1... here's mine, this will be our base layer as we have to add some new layer on top, be sure to follow the corroect layer sequence  looks pretty awesome huh? lol
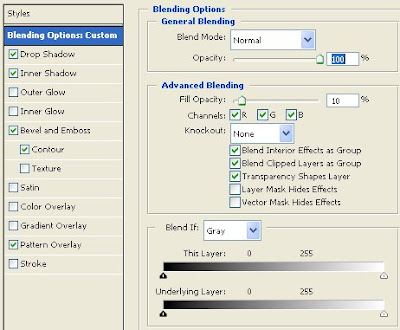
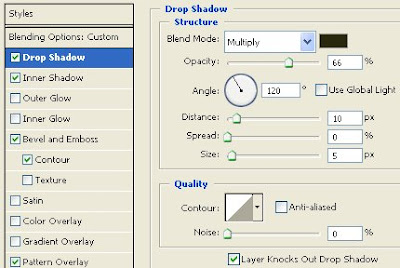
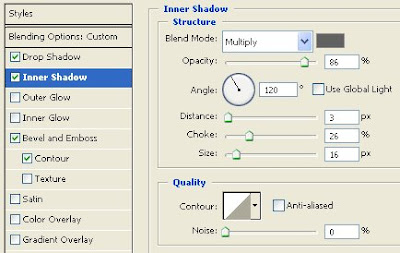
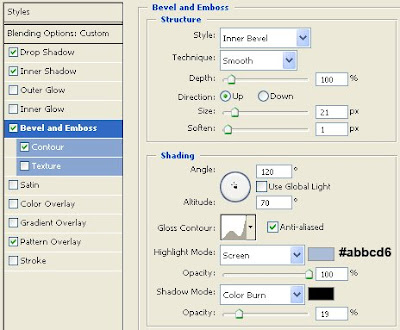
now the fun part, we add a new layer on top of it, select shape 1 on the layer palette and click ctrl+j, now we have a new layer named shape 1 copy which is a copy of our base layer, rename the layer stripes. now go to layer style and add this settings: 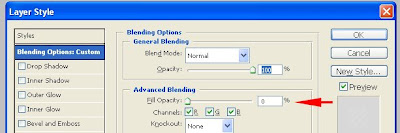
2. deselect gradient overlay
3.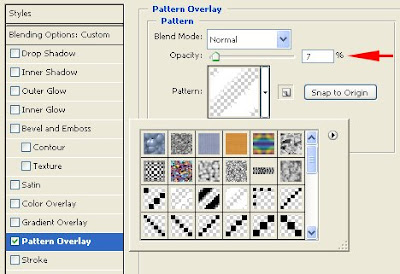 you should have a stripe pattern but its ok if you don't add the stripes
 looks pretty awesome huh? lol
and we add some gradients, the colors are #6d0019 and #a90329, so now we have this one
 wow?
wow?
 wow?
wow?1.

2. deselect gradient overlay
3.
 you should have a stripe pattern but its ok if you don't add the stripes
here is what our button looks like so far 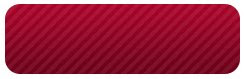 nice!!!
 nice!!!
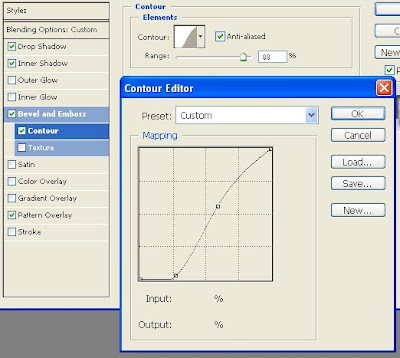
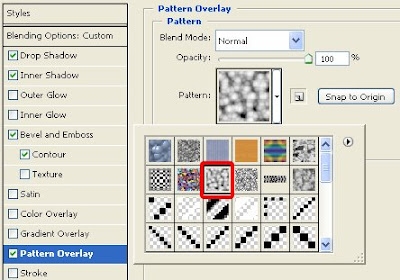
select again our base layer ang ctrl+j to copy it and rename it glass... so now we have three layers which is glass on top followed by stripes then shape 1 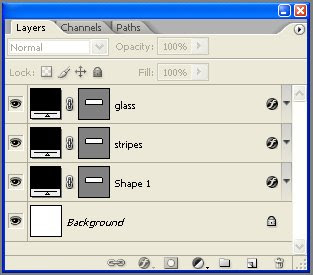 moving on.... here is what make's our button looks pretty cool!!! the tricky part.... select the glass layer and apply these settings
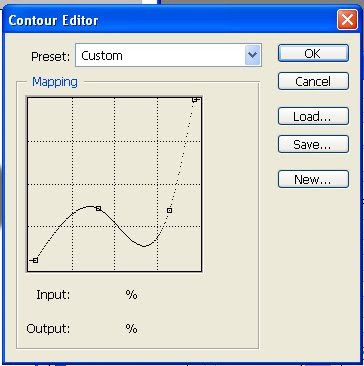
for the above gloss contour
 well those are pretty much it i think... anyway here's what it should look like
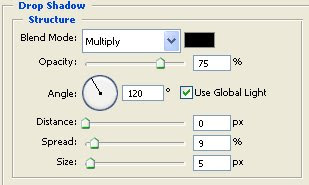
 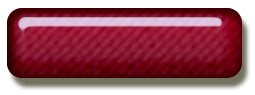 pretty cool right??? now we can add some text... using the horizontal type tool to add our text, type "click here" for our text on top of the glass layer, select impact as your font, add gradient to your text or you can just use a white text, here i use these vales for my gradient: #feae31 and #efe457 then add a drop shadow with this settings:
and here's our final button with the added font, you can add some graphics on the side like an arrow or something like that or some small text on top


you can use the settings of the glass buttons on my free samples here Free Web Buttons
hope to see you on the next tutorial
thaaaaannnnnnkkkkkssssss!!!!!!!!
 moving on.... here is what make's our button looks pretty cool!!! the tricky part.... select the glass layer and apply these settings


for the above gloss contour


 well those are pretty much it i think... anyway here's what it should look like
  pretty cool right??? now we can add some text... using the horizontal type tool to add our text, type "click here" for our text on top of the glass layer, select impact as your font, add gradient to your text or you can just use a white text, here i use these vales for my gradient: #feae31 and #efe457 then add a drop shadow with this settings:
and here's our final button with the added font, you can add some graphics on the side like an arrow or something like that or some small text on top

you can use the settings of the glass buttons on my free samples here Free Web Buttons
hope to see you on the next tutorial
thaaaaannnnnnkkkkkssssss!!!!!!!!


Nice Blog,
Button which you have given are nice and its useful for all the web designers. I accept sagar's note, that the site is updated regularly by the site administrator.
Expecting more details about web designing. Also I found some useful tips at cubicleninjas.com.
Thanks,
Cubicle Ninja - Chicago Design|Website Design|Web Development|Graphic Design
I think this tutorial is really nice and you done a great job for your first tutorial. I hope you continue like this.
Web Design Quote
Nice and informative blog. Thanks for sharing your task.
Robert
Web Design